Gary Green

Wednesday, January 09, 2008 

Eight Great Dashboard Widgets

I have decided rather than work anymore tonight, I'd browse the latest widgets that I can add to my dashboard. This is what is called an "uninspired blog entry." Basically, it's a cheat because I'm feeling too lazy to actually come up with something of my own, so I'm going to use the best of things other people have come up with. Don't hold it against me. You may love these widgets as well. Here we go!

#1 - "Sing That iTune"


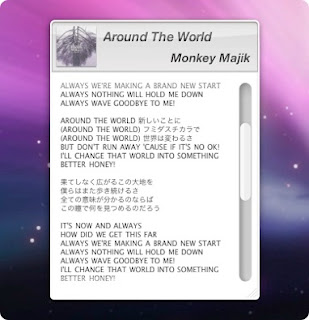
This widget displays the lyric for iTunes current track along with its artwork. The lyrics are saved in “Documents/Sing that iTune!” folder and you can also add your self-made lyrics in there. Sync the folder with iPod’s Notes folder to bring it. Option to save lyrics in music files is also available.

#2 - Plasma Tube - The Motion Light Widget


Engineered Like No Other. The Plasma Lamp Leaves your grampas old Motion Light in the 60’s! We’ve filled this sucker with a material patented exclusively to innermindMedia. This Plasma is like no liquid you’ve ever seen and it simply defies the laws of gravity and physics. This is the ultimate Eye Candy for your Os X Dashboard

#3 - FuguMaze


A 3D maze featuring standard first person mouse and keyboard navigation. Visuals include dynamic lighting and bump mapping. Uses the Unity web player.

#4 Birth of an Apple Store


This widget displays images of the birth of the new Apple Store in Boston.More info at http://www.ifoapplestore.com/boston/index.html.

#5 LOST Season Four Premiere Countdown


Season Starts January 31st 2008 at 8/7c.

#6 Christmas is Coming Countdown Clock!!


Just in time for January. Do you need my list yet?

#7 - "Starry Night"


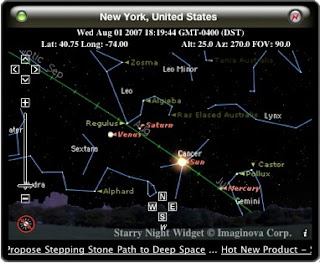
Astronomy widget that will let you see the sky (planets, constellations) for any location on Earth. Set your location by ZIP/postal code or by latitude and longitude, and the widget flips to show a view of the current sky. With a touch of a button, see the sky from all directions. It’s easy to customize your view. Choose to show constellations, the horizon, the ecliptic line, and labels for the celestial sights above. The widget refreshes your sky image every few minutes so you are always looking at something new.

#8 - "Zodiac"


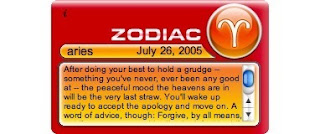
A simple widget for displaying your daily horoscope. The data is fetched from the astrology.com site.


Tuesday, December 11, 2007 

More Fun with Your Dock

To get rid of an application from your dock, just click on it and pull it out of the dock. You'll see a little poof of smoke. Just let go of your mouse and gone it is.


To get it back, just go to your Applications menu and look for that application. It's easy. Select the icon, hold and drag it down into your dock. Wait for the other items there to make way for the new application, then drop it in. If you don't like where it is, click on it again and move it over left or right by dragging it around the dock and dropping it wherever you want.


THE CONTEXTUAL MENU is what you'll get if you click on an icon in your dock and hold it. You can use the contextual menu to remove an icon from the dock, open that application automatically every time you launch, or to open the application.


Once the application is opened, if you click on the icon in the dock again, your menu will be slightly changed. Now you also have the options to quit or hide the application.


You can also add a folder to the dock so that you can readily find it. Just drag on the folder and drag it to your dock, but you have to drag it over to the right side of the dock's dividing line. You can also drag j-pegs there (then if you click on it, the j-peg will open up in PREVIEW). The left of the dividing line is for applications, and the right is for documents pics and folders, etc.


Once the folder is in your dock, you can click to open it, or click and hold to get the folder's CONTEXTUAL MENU. If you have sub-menus or icons stored in that folder, they will appear in the menu and you can select them. The application that runs that icon will automatically launch if it's not already open.


You may also have noticed, also on the right of the dividing line, the icon in your dock with a @ character at the top. This is an icon that will automatically link you to a MAC OS X web page where you can find more information about things you can get me for Christmas!

Finally, note that in the dock, you will always see a small black triangle under any application that is already open on your computer. FYI, another way to check and see what applications are currently open is to hold down the OPTION KEY and then hit TAB. And if you keep the OPTION KEY pressed and click TAB, you will move from one open application to the next.

Remember, anytime you pull something off the dock, you don't have to worry about having deleted it. The items on the dock are not the original items themselves, but simply exist to point to where those items are actually stored on your hard drive.

Wednesday, November 21, 2007 

SPOTLIGHT - More than just a lousy Madonna song

You can change the way SPOTLIGHT finds things for you. Just head to SYSTEM PREFERENCES and click on SPOTLIGHT.


It's divided into two categories... SEARCH RESULTS and PRIVACY.


Let's start with SEARCH RESULTS. Look at this list. The numbers are important because they dictate the order in which SPOTLIGHT will search through your computer. To change the order, all you have to do is grab the categories you want into the order you want them! Think about the applications you use the most, and which ones you never use, then tackle the default order of your Spotlight Search Order and you'll find that the results Spotlight gives you will serve your specific needs faster.


Below the list are where you can change your keyboard shortcuts for the SPOTLIGHT MENU and the SPOTLIGHT WINDOW. If you don't use these shortcut keys much, you should probably just leave them where they are and start practicing with them before you decide you want to make a change.

Now let's look at the PRIVACY tab. This is where you enter in areas on your computer where you DON'T WANT SPOTLIGHT TO SEARCH. This would be if you had other people who might use your computer and you've got items or material on it you don't want to come up should they do a SPOTLIGHT search. You probably will want to use this to prevent any of your other three kids to discover how much Christmas loot you're getting your favorite child (that would be the one who writes a blog to teach you all about your Mac computer).


See you at Thanksgiving tomorrow!

Friday, November 09, 2007 

It's easy to send your iPhoto slide show to friends as long as you know that you can't send it as an IPhoto file.


Creating movies in iPhoto is fun, and you can always play it back in iPhoto at your opwn computer, but to send it to someone else, you have to export it into a Quicktime file. Here's how you do it.


First, click on your FILE drag down menu and select EXPORT.


iMovie gives your file a .mov extension, which is what it needs to be to become a Quicktime file. Give it the name and you want and make sure you remember where you are saving it.

Select the size you want your slideshow to be.


The export process happens automatically.


And when it's done, you're ready to attach your Quicktime file in an e-mail and share it with the world.

Thursday, November 08, 2007 

Mom... Meet Your Dashboard. Dashboard... This is My Mom.

One of the cool newer features mac offers is the dashboard and widgets. You can access your dashboard by clicking on the dashboard icon in your dock. You can also open your dashboard with the keyboard shortcut of F12.


Once you've done that, you see that your screen darkens a little, and several new items, called widgets appear all over your screen. The shot below shows some basic default widgets, such as calendar, calculator and local time.


These widgets connect through the internet and are always loaded with the most recent information. You can select from countless widgets that will appear on your dashboard and give you all kinds of useful, or useless knowledge. For example, some of the more basic widgets will give you local weather, movie times, and gas prices. I personally have widgets that show the weekly box office grosses, overnight television ratings and the weather in my most favorite city in the world, San Francisco.

Think of widgets of little mini programs. They are simple and lightweight and give you quick information in a fun, visual way, but individually, they don't really do all that much. They're like computer versions of the little coupons, magnetic calendars and post-it notes you might put on your refrigerator door.

Since widgets are easy to design, there are a lot of different ones available, and they can be created by just about anyone!

To get a new dashboard widget, go to the lower left of your screen when dashboard is open, and click on the plus sign in the circle. This opens the WIDGETS BAR (incidentally, when you have the widgets bar open, you'll notice that the plus sign in the circle changes to an x).


Here you see numerous additional widgets that mac has already installed for you to add to your dashboard should you want them. To get one of these widgets added to your dashboard, you can simply click on it, and it will be added immediately (with a nice ripple effect to boot). Then you can move them to the space where you want them to reside. Or you can click on the widget you are choosing and HOLD THE CLICK DOWN and immediately position the widget where you would like it to go.

As long as you have the widget bar open, each widget you have on your dashboard has an "x in a circle" button in its top. left corner. Clicking that will close out that widget, and it will no longer be on your dashboard until you put it there again.

Tomorrow, I'll show you some specific widgets, and where you can go to choose from lots and lots more!

Wednesday, November 07, 2007 

Parking it at the Dock


Here are some cool things you can do with your dock.


Notice the dividing line on your dock and roll your mouse over it. You see your mouse turns into a different icon. If you click on that dividing line and drag up, or drag down, you can resize your dock super fast.


Now put the mouse over the dividing line again and hit the CTRL KEY and click. A mini menu pops up to give you additional options for controlling your dock.


TURN HIDING ON - This temporarily gets rid of your dock completely. This will come in handy if you want to use that space at the bottom of your screen to open an application a little bit wider. I use this trick a lot when I have multiple design applications open so I can have a little more real estate on the screen. To get your dock back, hover your mouse down where it normally is and it will pop back up. Then hit the CTRL key and click again while on the dividing line and select TURN HIDING OFF. Your dock has returned to its normal position.

TURN MAGNIFICATION ON - If you select this, then anytime you roll over an icon in the dock, it will magnify a little, standing out from the rest of the icons.

POSITION ON SCREEN - Hover over this option and you get three choices - bottom, left and right. This tells the computer where you want your dock positioned on the screen. The preference is yours entirely, based on how you work and where you will find your dock to be the least intrusive.


MINIMIZE USING - This gives you two choices - GENIE EFFECT or SCALE EFFECT. This tells your computer which way to minimize open screens. It's simply an aesthetic choice. Give it a go be selecting each, and then clicking the yellow button on any open window to see the difference. The default is the GENIE EFFECT and frankly, there's no reason I can think of to change it, but again, just knowing it will make you the coolest Mac user in Banning, California.

There's another way to select your dock preferences, and that's by clicking on apple icon at the top of the screen and scrolling down to DOCK. You'll get the exact same menu.


Finally, there's the selection of DOCK PREFERENCES and this gives you more precise control over your dock. You can scale the dock size to any preference by moving the slider between SMALL and LARGE.


You can turn on magnification, but here you can control the actual size of the magnification (you can make the icons huge). The rest of the preferences are the same as what you pulled up by CTRL clicking on the dividing line at your dock.

Tuesday, November 06, 2007 

Getting Around with Short Cuts: Meet Your Apple Key

Hi Mom!

Even though you sent me to school in first grade with a coke bottle, when the instructions were explicitly requiring me to bring a jar (the difference in mouth size prevented me from participating in the Christmas snowman project of Holy Family 1976), I have decieded to forgive you and help you learn all the secret tricks of your new Mac. I am happy to see how excited you are to learn, and since you taught me so much over my lifetime, here's my chance to give a little something back.

Today, we will start off with an easy one. Here are some steps on jumping between things on your Mac. They will help you get a little more comfortable with your multi-talented COMMAND KEY (also known as the key with the little picture of the apple on it).

Ready...?


To switch between the different ways you can view icons in an open window, you hold down your COMMAND KEY with other keys. For example, you can hold down the COMMAND KEY on your keyboard and touch the 1 KEY, to go directly to ICON VIEW, as seen below:


if you hold down the COMMAND KEY and touch the 2 KEY, you will go directly to LIST VIEW:


And, if you hold down the COMMAND KEY and touch the 3 KEY, you go directly to COLUMN VIEW:


You may not ever decide to use these key combinations, but knowing them can make you seem super Mac-savvy, even as you're just beginning your uphill climb. Also, you'll look a lot smarter if you refer to the COMMAND KEY by its proper name, instead of calling it the "Apple Key," which does get the point across, but with far less panache.

I know, I know. I can already hear you, "Oh, I already KNOW HOW TO DO THAT!" Yes, yes, you are quite exceptional, mom (except when it comes to knowing the difference between a jar and a bottle). But did you know this....

If you hold down the COMMAND KEY and the SHIFT KEY at the same time and then hit the A KEY, you will be taken directly to your APPLICATIONS MENU, where you can find all your applcations, including the always-exciting CALCULATOR and the never-endingly dramatic DICTIONARY!!!


That's all for today. Try these out once and you'll never forget them. How's the dog?

Love,
Gary


Mac Tips for Mom!


Woah! Slow down, cheetah. You got here too fast. It's Tuesday, November 6. The first Mac Tip for Mom will be up later tonight. Hope you'll check back often!

FREE hit counter and Internet traffic statistics from freestats.com